Prepping for Springtime Tallahassee


The girls and I have been on Spring Break this week. It’s been a rainy one, so there’s been no beach trips, but we have made it to the zoo once between storms. I have a stack of papers to grade, but that urge just hasn’t hit me yet! This Saturday is my first major spring show, the Springtime Tallahassee Arts Jubilee, so in typical Kelly fashion, I’ve been doing my last minute creativity cram session. Since the weather’s been lousy, I’ve gotten tons of new jewelry created, but unfortunately, the weather hasn’t allowed me to mount any photos. I have to stain my boxes outside to escape the fumes! Hopefully tomorrow I might get one good day in before I have to pack up on Friday.

Since this show is in Tallahassee, the home of the Florida State Seminoles, I always create a few garnet and gold themed bracelets like this one (and yes, for the Gator fans, I even create some orange and blue themed bracelets, as much as it pains me :-). I really got on a bracelet run and realized today as I took stock of all I had done, I have 26 bling bracelets ready for this show! Yikes! I don’t think I’ve ever had 26 bling bracelets completed at once! They are my very favorite thing to make. They just make me happy with all their sparkly blinginess. How about you? What type of jewelry makes you happy?

Mermaids and Mamas Artful Adventure 2011


Registration is now open for Mermaids and Mamas Arful Adventure 2011!  This mother/daughter art retreat is designed for elementary school aged (pre-K through 5th grade) girls and their Mamas (or Grandmamas!).  Dates are Saturday-Sunday, May 14-15. Space is limited to 22 total participants so sign up soon as spaces go quickly! Hop on over to the Purple Cottage website for all the details.  If you are interested in working with me on a retreat for older girls, just let me know!

Cherish the Good Life...


Sunday morning, I sat at the kitchen table and cried. I mean seriously cried. I was home by myself for the weekend—DH and the girls had gone camping—and I was watching CBS’s Sunday Morning. They were sharing a story on the Japan disaster, and the reporter was interviewing an elderly Japanese man. He was talking about how he had not been able to find his daughter and two grandchildren, and halfway through the interview he just broke down sobbing. In between sobs, he said that if they were killed that he hoped they at least all died together. That’s when I lost it. What an incredibly sad statement. It reminded me of this story. Just the thought of children being ripped from their parents' arms rips me to pieces.

I continue to be glued to stories of what the Japanese people are enduring right now, and so many things have struck me. My staff and I talked about this at our Monday morning staff meeting, and I guess what’s struck me the most are the reports that say Americans have not been as giving in this tragedy as we have in others. I’ve wondered why that is. One said maybe it’s because, unlike Haiti, Japan is far from being a third world country and doesn’t need the help that Haiti did, and still does. Certainly our current economic downturn has probably contributed to it. My DH has even wondered aloud if Pearl Harbor is on the minds of some. I’ve been surprised that my students have not risen up to this tragedy as I’ve seen them do for others, like Haiti, or right here at home, to the abduction and murder of a local seven year old. They did finally mention Japan to me yesterday and asked if they could put out a donation jar during Spring Fling.

I guess I don’t care how rich a country is. A tragedy is a tragedy, and this one has torn me up. The daily stories from survivors are heart wrenching, especially when they tell the stories of their loved ones who did not survive or have not even been found. I know that I am blessed and I am reminded of that every day. As I mentioned in this post, if you have the means and opportunity to sit down and read a blog, you, too, are blessed. I drove by the graffiti in this picture for weeks thinking I needed to remember to bring my camera to capture it fully. My Blackberry just wasn’t doing it justice. I’ll be printing this out and hanging it in my office and in my studio as a reminder. I do live the good life. And while those in Japan may have been living the good life up until March 11, they certainly aren’t now and won’t be for quite some time. This country will take many, many months and years to heal from this tragedy, both financially and emotionally. Please continue to keep them in your hearts and in your prayers. And never take your good life for granted.

Tuesday Treasury Shoutout: Team FEST!

etsy treasury,team fest

Here's a little shout out to the Florida Etsy Street Team today.  Thanks to Melody of OhBabyDotCom and Gabriela of InYourBones, team members from The Pines and Mount, Florida, respectively for sharing some Florida artists love.  Above, Melody included one of my Hope for Japan photos, first row, second spot.  Below, Gabriela included my Coming Up Daises photo, third row, third spot.  View Melody's treasury with clickable links here and Gabriela's here and pay a visit to all these wonderful Florida artists.
 

etsy treasury,team fest

Hope for Japan...


As we all watch the devastation in Japan continue to unfold, I know the question many of us are asking is what can we do to help.  I believe what we can do to help is give.  To that effort, I've just listed three new photos in my Etsy shop.

100% of the proceeds for these prints will go to the American Red Cross fund designated for Japan.  You all helped me raise nearly $500 for Haiti.  Let's do it again!

Hope for Japan No. 1, Hope for Japan No. 2 and Hope for Japan No. 3 are all blooms because, to me, blooms represent hope and growth. That's what the people of Japan need now and for the future.  Tragedies like this remind us all how blessed we are at this very moment, and if you have the ability to read this, you are included in that "we."  Cherish every moment.

An Artful Journey 2011: One Last Book

Board Book 1

The Big Book! That’s really the only way to describe it! This was the biggest book I created, and it encompassed many of the techniques used in the smaller books. Here’s what we did…

Board Book 2

This book is 8”x10”. The exterior covers, interior covers and signature covers are all paste paper pages trimmed to the size needed for the finished book, so I created all those papers first. Albie demonstrated the technique for covering the book board covers with our designated cover papers and then gluing in the book cloth spine. Then we measured and trimmed papers for our signature pages. Mine has three signatures and are sewn in with a pamphlet stitch (can you tell I’m a simple pamphlet stitch fan?) I used paste papers as covers for each of the signatures to add more color to the interior of the book. The paper itself is Stonehenge, so it’s good and strong for adding juicy water colors or acrylics.

Board Book 3

I sit here and look at this pile of books I created in three days, and I wonder when I slept! (Okay, so I didn’t sleep much…) But what a wonderful learning experience it was. There are so many ways I can put all this to use that my brain is just overflowing with ideas. I’m even working on simplifying some of these books to use as projects for Mermaids and Mamas Artful Adventure 2011 (scheduled May 14-15 this year, more details to come soon! Click here to read about last year's Adventure) The last thing I’ll have to share with you in my next Artful Journey 2011 post are beautiful pictures I took around the retreat center.

Happy St. Patrick's Day from this Irish girl to you!

An Artful Journal 2011: Little Treasures

Treasure Books, spines
So, on to more book forms I learned at An Artful Journey! These little gals were most definitely the most challenging thing I learned. Like the Noble stitch books, I made two to try to cement the process in my head, but I’m definitely going to need some reminding on the stitch. This is called a French Twist stitch, and it’s a variation on a long stitch.

Treasure Book 1, Front Cover

Treasure Book 1, Top
As for the process, we started by cutting our book boards to the size we wanted first. These work best as small little treasures; my books are about 3” x 4”, but Albie’s class sample was even smaller than that. It takes four pieces of book board cut to your desired size. Both covers are actually two pieces glued together with the ribbon sandwiched and glued in between.

Treasure Book 1
Treasure Book 2, Front Cover
The texture acheived on the covers was done using that magical thick gesso mentioned down here and stencils. Pretty cool, huh? I kept mine pretty simple and didn’t attempt to do quite as detailed of a painting technique as Albie did (I have no patience and no comfort with a tiny paint brush!).

Treasure Book 2, Back Cover
Once our covers were completed, we tore our paper to size. These particular books have nine signatures, but the number of signatures is up to you. Then it was all about the stitching, weaving the ribbon through the French Twist to anchor it. On the aqua book, I forgot to add in my closure ribbon before I glued the pieces together so I just tied it with an exterior ribbon. When I went on to the second book, I didn’t make that mistake!

Treasure Book 2, Interior
Treasure Book 2, Spine
These books truly are little treasures and were pretty time-consuming. I’m sure I will attempt a few more though; I do believe I’ll be addicted to that thick gesso and all the magic it can create. Cindy has been posting tons of pictures on her blog; go over and take a peek at the two posts linked below so you can get a feel for the whole retreat. In this post in the first couple of pictures under “Albie’s Class,” you can see me with my old lady glasses actually learning the stitch for this book. In this post, there I am in the third picture, looking all grungy with my paint-splattered apron, camera in hand (and I must say I thoroughly enjoyed doing absolutely nothing to my hair all weekend; going hair-dryer less is a wonderful thing!). I have one more book to share with you later this week!

Time for March Free Bling!


Time for Free Bling Friday! Random.org picked comment number five as the winner of February's Free Bling, so congratulations to Diana from Woodbridge, Ontario, Canada!

For March, how about a pretty little breath of spring? This is my "Simply Sweet" photo on a 1" glass tile. It comes complete with a silvertone ball chain cut to the length of your choice. To be eligible to win, simply visit either of my Etsy shops (here for jewelry and here for photography) and leave a comment in the comment box below with the link to your favorite piece along with a way to reach you and where you’re from by midnight Thursday, April 7. Want more entries? Tweet, blog or Facebook this giveaway and leave another comment with the link. The next winner will be drawn via random.org Friday, April 8. Don't want to miss a single Free Bling Friday? Click here to sign up for free weekly email updates or subscribe in the reader of your choice over there in the right column. And be sure to join my Facebook Fan page for Fan specials. Thanks for stopping in!

An Artful Journey 2011: Gessoed and Painted Book

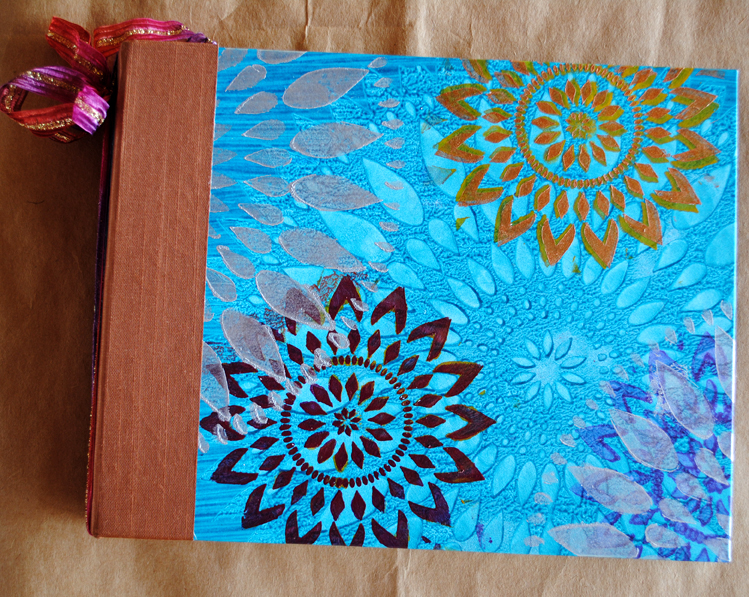
Gessoed and painted book, Front
Is “gessoed” a word? My spell check does not approve. Oh well. Sorry I’ve kept you waiting on my next book form! It’s been a very busy week around these parts! I think this is my favorite book of all. The construction is done with a simple pamphlet stitch (I did three signatures), but it’s the magic that takes place before the sewing that makes it so special.

I started with a sheet of Stonehenge paper and covered it completely, front and back, with a thick gesso. We used this. There were several things we could do with this as we were gessoing the paper. We could use stencils to get some textured designs (more on that in my next book form), use stamps or mastic spreaders to stamp into the gesso, or we could simply swipe the gesso over the paper using an old credit card or used gift card. For this one, I went the third route and left it a bit messy in spots to give it a little bit more texture. I gessoed one side of the paper and then completely let that dry before I did the other. I actually used a full 22” x 30” sheet of Stonehenge in this process, but you can trim down your paper to your desired size before you gesso, which is what I’ll be doing when I create these at home.

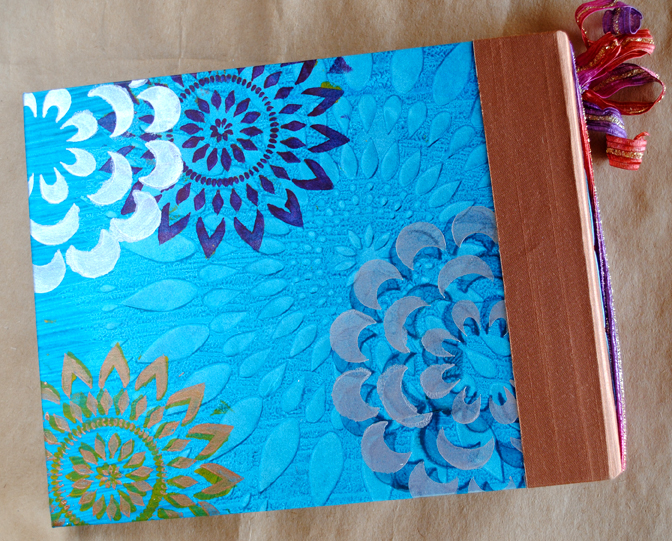
Gessoed and painted book, Back
Once the gesso was dry, I trimmed my big sheet down to the size of book cover I wanted, taking into account that I wanted a pocket on the inside. I can’t tell you exact measurements because I didn’t really do exact measurements; I just went with what looked right! I started on what would be the outside of the cover and first painted a solid, watered-down deep turquoise as the first layer. Once that dried, pretty quickly actually, I used a foam rubber stamp dipped in copper metallic paint for the all over design. Once that side dried, I turned it over and painted what would be the inside of the cover, again in that turquoise, but a little deeper color this time. Then once the inside dried, I folded up the bottom to create the pocket. The pocket is secured with this really awesome, super thin, super sticky double-sided 4m tape Albie shared, which I must find!

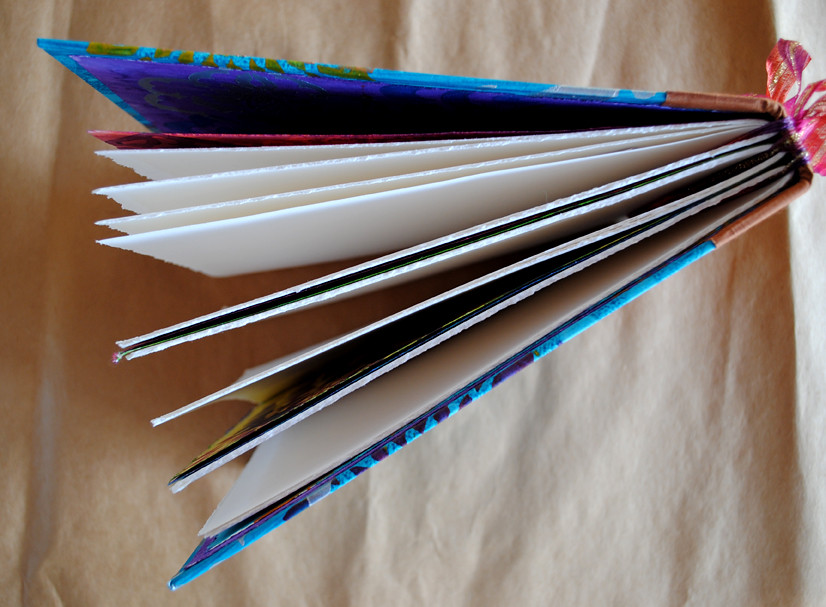
Gessoed and painted book, Top
From there, it’s on to the stitching. I tore my pages from Stonehenge, allowing for a bit of fanning out in each signature, and sewed each signature into the spine, simply folded, using a pamphlet stitch for each one. Of course, there is more measuring involved than I’ve shared here, particularly in placing the sewing holes on the cover/spine, but I can’t quite wrap my brain around how to explain that right now! Come to my studio and I’ll show you! :-)

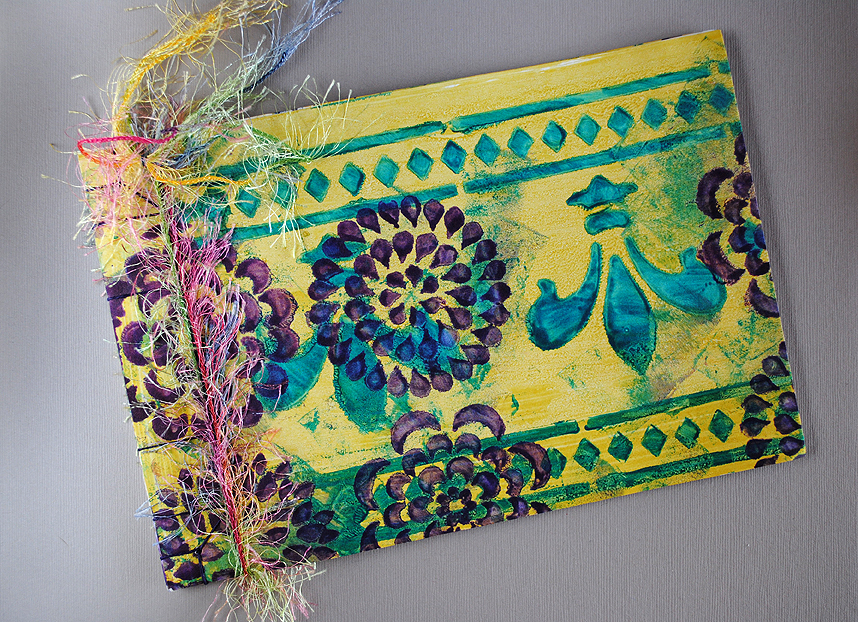
Gessoed and painted book, Inside Cover showing pocket
You really have to see and feel this book in person to get the full effect. The gesso over the paper makes it feel like leather, much like molding paste does to a soft muslin fabric liked I used in the book I created in DJ’s class last year. And again, the eyelash yarn woven through is just for a little extra Kelly bling; it’s not actually incorporated into the actual sewing of the book. I LOVE this book! I’ve ordered the gesso and paper and plan to get started creating a lot more of these!  I'd told DH we simply have to expand my studio. :-)  I need more space!  Scroll down to see the other books I've already shared.  Three more books to go!

An Artful Journey 2011: Noble Stitch Binding

Noble Stitch Book 1, Front
Ready for the next two books I created at An Artful Journey? These two are done with what Albie called a “Noble” stitch. I understand it also can be called a Japanese stab binding. I could not find any Noble stitch tutorials on You Tube, but I did find a few for the Japanese stab binding. While it’s very similar to what we did here, it’s not exactly the same. With Albie, we did this cool little triangular detail on the corners. She’ll be emailing us all the instructions soon, so I’m glad I’ll have those to fall back on!

Noble Stitch Book 1, Back

Noble Stitch Book 2, Front

Noble Stitch Book 2, Back

Noble Stitch Book 2, Stitch Detail (Click to enlarge on all)
These again started with our painted paste papers, and again I made two to try to cement the stitch in my head. These covers are cut to 6” x 9”, and then I tore Stonehenge paper just a tad smaller for the interior pages. The one difference about this one it is really doesn’t have a signature per se, if you consider signatures folded and nested pages. With this technique, each page is in and of itself, and then you just stack them all together, sandwich them in between your two covers and then punch your holes for stitching. The Japanese screw punch is a wonderful tool! It makes your holes so much cleaner and so much easier to punch than using an awl. I did not use the funky eyelash yarn actually in the stitch; I just added it after the stitch was complete for a little extra bling, or as Albie would say, “to tart it up a bit!” I really enjoyed making these as well and can see many more in my future, particularly with the types of covers I’ll share with you next. ;-)

Noble Stitch Book 2, Detail

An Artful Journey 2011: Do-Si-Do!


I never realized there were so many different book forms until I attended this retreat. And I also never realized that some of the simpler forms were just that: very simple, but still very fun. This little gal is called a Do-Si-Do. Any time any of us needed Albie’s help and she couldn’t get to us right then, she said, “Have you made a Do-Si-Do yet?” Meaning, go make yourself a simple little Do-Si-Do while you’re waiting. And given that my most favorite Girl Scout cookie is the Do-Si-Do, well, you know I had to make one!

These required no instructions, just a quick study of Ablie’s Do-Si-Do sample. This again started with one 12” x 18” sheet of painted paste paper, and from there it was really simple. I folded the paper in half longways, making it 6” x 18”, and then used a glue stick to glue the two 6” sides together. I then folded that down to 6” x 9”  and then folded each side again, down to an accordian like shape with 6” x 4.5” sections. From there it was just measuring and cutting the signatures and sewing them in with a simple pamphlet stitch. Viola! A cute little Do-Si-Do! I can see making these as fun little gifts; once the paste paper is painted, they are super duper easy to put together and seem to be a good way to use up scraps of good paper. Up next, my Noble stitch books!

Tuesday Treasury Shoutout: FoxyGirlBoutique and PedroNogueira

We interrupt this An Artful Journey 2011 report for a Tuesday Treasury Shout Out!  These two I received yesterday were just too yummy not to share. Thanks to FoxyGirlBoutique for including Miss Violet (first row first spot) in the first treasury; view it in all its glory with clickable links here.  Those sheep are calling my name. I'm such a sucker for animal paintings and photographs.
Photobucket

And thanks to PedroNogueira for including Miss Jasmine (first row fourth spot) in this second treasury. Great oranges! And I really love that "I intend to live forever" button. View it with clickable links here.

Photobucket